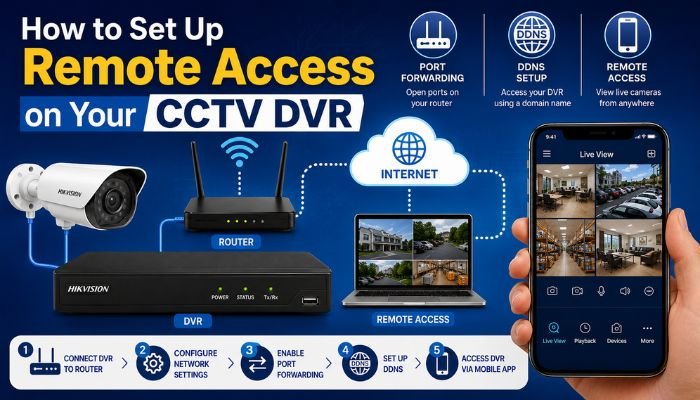
Remote access is one of the most useful features of modern CCTV systems. It allows you to monitor your home, office, shop, or warehouse from anywhere using your smartphone, tablet, or computer. Whether you’re traveling, at work, or simply away from your property, remote viewing helps you stay connected to your security system 24/7.
In this guide, we’ll explain how to set up remote access on your CCTV DVR using port forwarding, DDNS, and popular mobile applications such as Hik-Connect and DMSS (often called DP Plus by some users). Follow these steps carefully to access your CCTV footage remotely without technical hassles.
If you’re planning to install a new cctv camera in jaipur, understanding remote viewing setup can help you choose a DVR that supports easy mobile access.
What You Need Before Setting Up Remote Access
Before beginning, ensure you have:
- A DVR or NVR connected to the internet
- Broadband or fiber internet connection
- Router administrator access
- Smartphone or computer
- DVR username and password
- Mobile app compatible with your DVR brand
Most modern DVRs support both cloud-based access and traditional port forwarding methods.
Method 1: Using Hik-Connect or Cloud-Based Mobile Apps
Cloud-based remote access is the easiest method because it does not require complicated router configuration.
Step 1: Connect DVR to the Internet
- Connect the DVR to your router using a LAN cable.
- Go to Network Settings on the DVR.
- Enable DHCP.
- Confirm that the DVR receives an IP address.
You can verify connectivity by checking whether the DVR status shows “Online.”
Step 2: Enable Platform Access
For Hikvision DVRs:
- Open Main Menu.
- Navigate to Network → Advanced Settings.
- Select Platform Access.
- Enable Hik-Connect.
- Create or verify the verification code.
The status should display “Online.”
Step 3: Install the Mobile App
Download the appropriate application:
- Hik-Connect for Hikvision systems
- DMSS for Dahua systems
- XMEye for compatible DVRs
- Manufacturer-specific mobile apps
Step 4: Add the DVR
- Open the mobile app.
- Create an account.
- Tap Add Device.
- Scan the QR code displayed on the DVR.
- Enter the verification code if required.
Once completed, live camera feeds should appear on your smartphone.
Screenshot Walkthrough
Typical screens include:
- Device Management
- Scan QR Code
- Add Device
- Live View Dashboard
- Playback Screen
Most users can complete cloud setup within 10 to 15 minutes.
Method 2: Setting Up Port Forwarding
Port forwarding provides direct remote access to your DVR through your router.
Step 1: Find DVR IP Address
On the DVR:
- Open Network Settings.
- Note the local IP address.
Example:
- DVR IP: 192.168.1.150
Step 2: Assign a Static IP
A static IP prevents the DVR address from changing.
Configure:
- IP Address
- Subnet Mask
- Gateway
- DNS Server
Save the settings and restart the DVR if necessary.
Step 3: Identify DVR Ports
Common ports include:
- HTTP Port: 80
- Server Port: 8000
- RTSP Port: 554
Your DVR menu will display the exact port numbers.
Step 4: Access Router Settings
- Open a web browser.
- Enter the router IP address.
- Log in using administrator credentials.
Common router addresses:
- 192.168.0.1
- 192.168.1.1
Step 5: Configure Port Forwarding
Locate:
- Port Forwarding
- Virtual Server
- NAT Settings
Add the DVR ports and direct them to the DVR’s local IP address.
Example:
| External Port | Internal Port | Device IP |
|---|---|---|
| 80 | 80 | 192.168.1.150 |
| 8000 | 8000 | 192.168.1.150 |
| 554 | 554 | 192.168.1.150 |
Save the configuration and reboot the router if required.
Step 6: Test Remote Access
Use your public IP address from another internet connection.
Enter:
http://YourPublicIP:Port
If configured correctly, the DVR login screen should appear.
Method 3: Using DDNS (Dynamic DNS)
Many internet providers assign dynamic public IP addresses that change periodically. DDNS solves this problem.
What Is DDNS?
DDNS links your changing public IP to a permanent hostname.
Example:
Instead of:
- 103.85.XX.XX
You can use:
- mycctv.ddns.net
Step 1: Create a DDNS Account
Register with a DDNS provider.
Popular options include:
- No-IP
- DynDNS
- Manufacturer-provided DDNS services
Step 2: Configure DDNS in DVR
- Open DVR Network Settings.
- Select DDNS.
- Enable DDNS.
- Enter:
- Hostname
- Username
- Password
Save the settings.
Step 3: Verify DDNS Status
The DVR should update your hostname automatically whenever your public IP changes.
Step 4: Access Remotely
Instead of using the public IP address, use:
http://yourhostname.ddns.net
This method provides consistent access without needing to track IP changes.
Troubleshooting Common Remote Access Problems
DVR Shows Offline
Possible causes:
- Internet disconnected
- Faulty LAN cable
- Router issue
- Incorrect DNS settings
Mobile App Cannot Connect
Check:
- DVR online status
- Correct serial number
- Correct verification code
- App permissions
Port Forwarding Not Working
Verify:
- Public IP availability
- ISP restrictions
- Correct port configuration
- Firewall settings
DDNS Not Updating
Check:
- DDNS account validity
- Username and password
- Internet connectivity
Security Tips for Remote CCTV Access
To keep your CCTV system secure:
- Change default passwords immediately.
- Use strong administrator passwords.
- Enable two-factor authentication if available.
- Regularly update DVR firmware.
- Disable unused ports and services.
- Avoid sharing login credentials unnecessarily.
Proper security prevents unauthorized access to your surveillance system.
Final Thoughts
Setting up remote access on your CCTV DVR allows you to monitor your property from anywhere in the world. For most users, cloud-based solutions like Hik-Connect or DMSS provide the simplest setup. Advanced users can also use port forwarding and DDNS for direct remote connectivity.
If you’re considering a new surveillance installation, consult a professional provider of cctv camera in jaipur to ensure your DVR supports secure remote viewing. Before purchasing, it’s also wise to compare the cctv camera cost in jaipur and choose a system that offers reliable mobile monitoring, cloud connectivity, and long-term security features.
A properly configured remote access setup ensures that your CCTV system protects your property even when you’re miles away.